
3. Speaking and Writing Tasks with Poodll Solo
Poodll Solo is an automatically graded speaking activity. You set a topic and targets, and the student records a response. Solo transcribes the speech and analyses it with AI, gives the student a grade, shows some statistics and suggests grammar corrections. It can also be used for writing tasks.
Solo is useful for oral exam preparation, regular speaking practice, low stakes speaking assessments and short writing tasks with instant feedback.
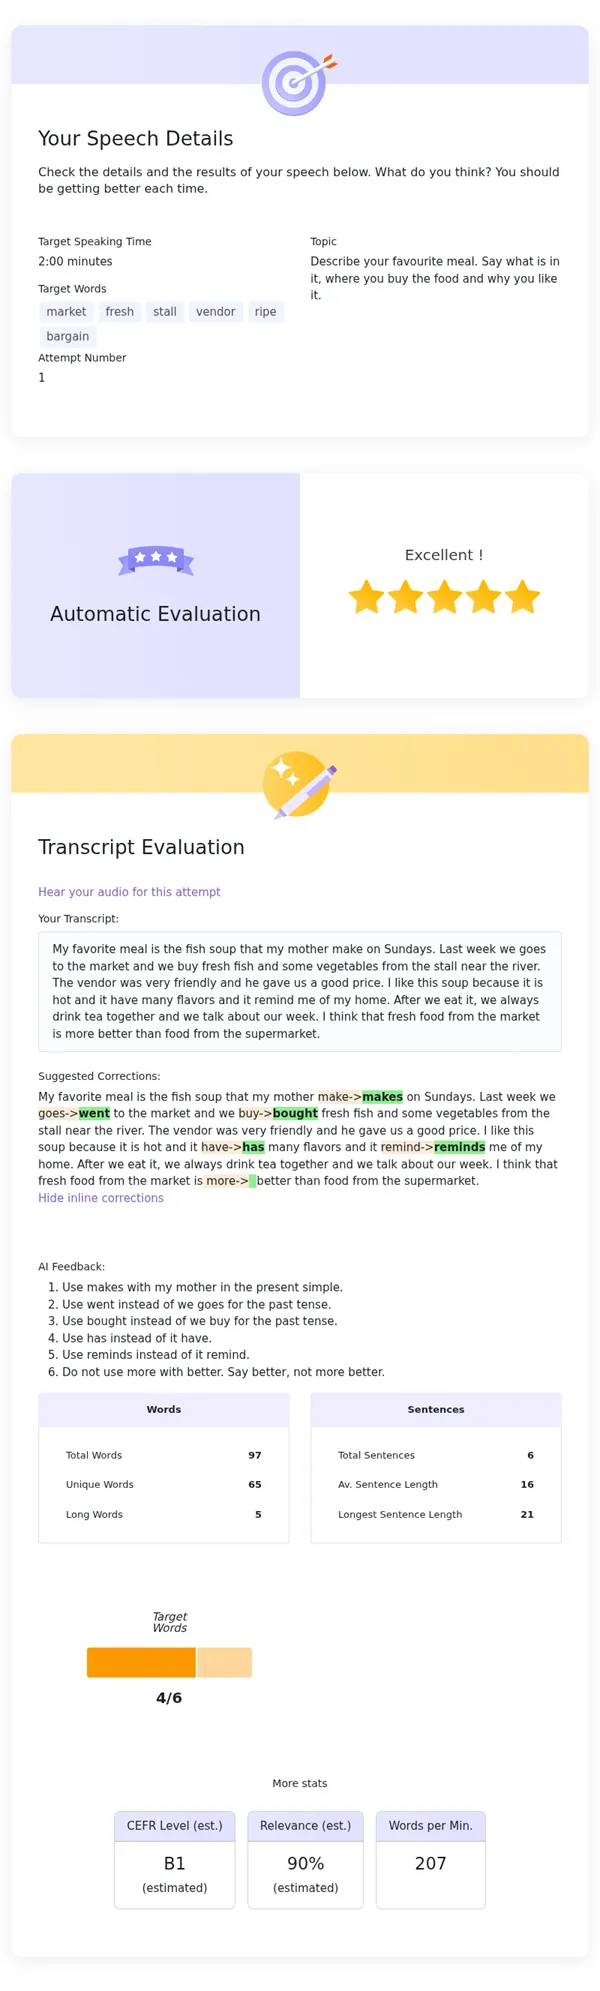
Figure 3.1. A student’s automatic results in Poodll Solo.
3.1 Choosing a step sequence
Section titled “3.1 Choosing a step sequence”A Solo activity takes the student through a sequence of steps. Choose the sequence in the Activity Steps setting.
| Activity Steps | What the student does | Use for |
|---|---|---|
| Prepare → Record → Model (default) | Reads the topic, records a response, then sees the model answer if you provided one. | Most speaking tasks |
| Prepare → Type → Record → Model | Types a response, such as a script, then records it being spoken. | Scripted speaking and presentation practice |
| Prepare → Type → Model | Types a response. No audio is involved. | Short writing tasks |
| Record → Model | Goes straight to recording, without a preparation step. | Spontaneous speaking and timed tests |
Every sequence ends with the student’s results. The Model step is shown only if you have set a model answer.
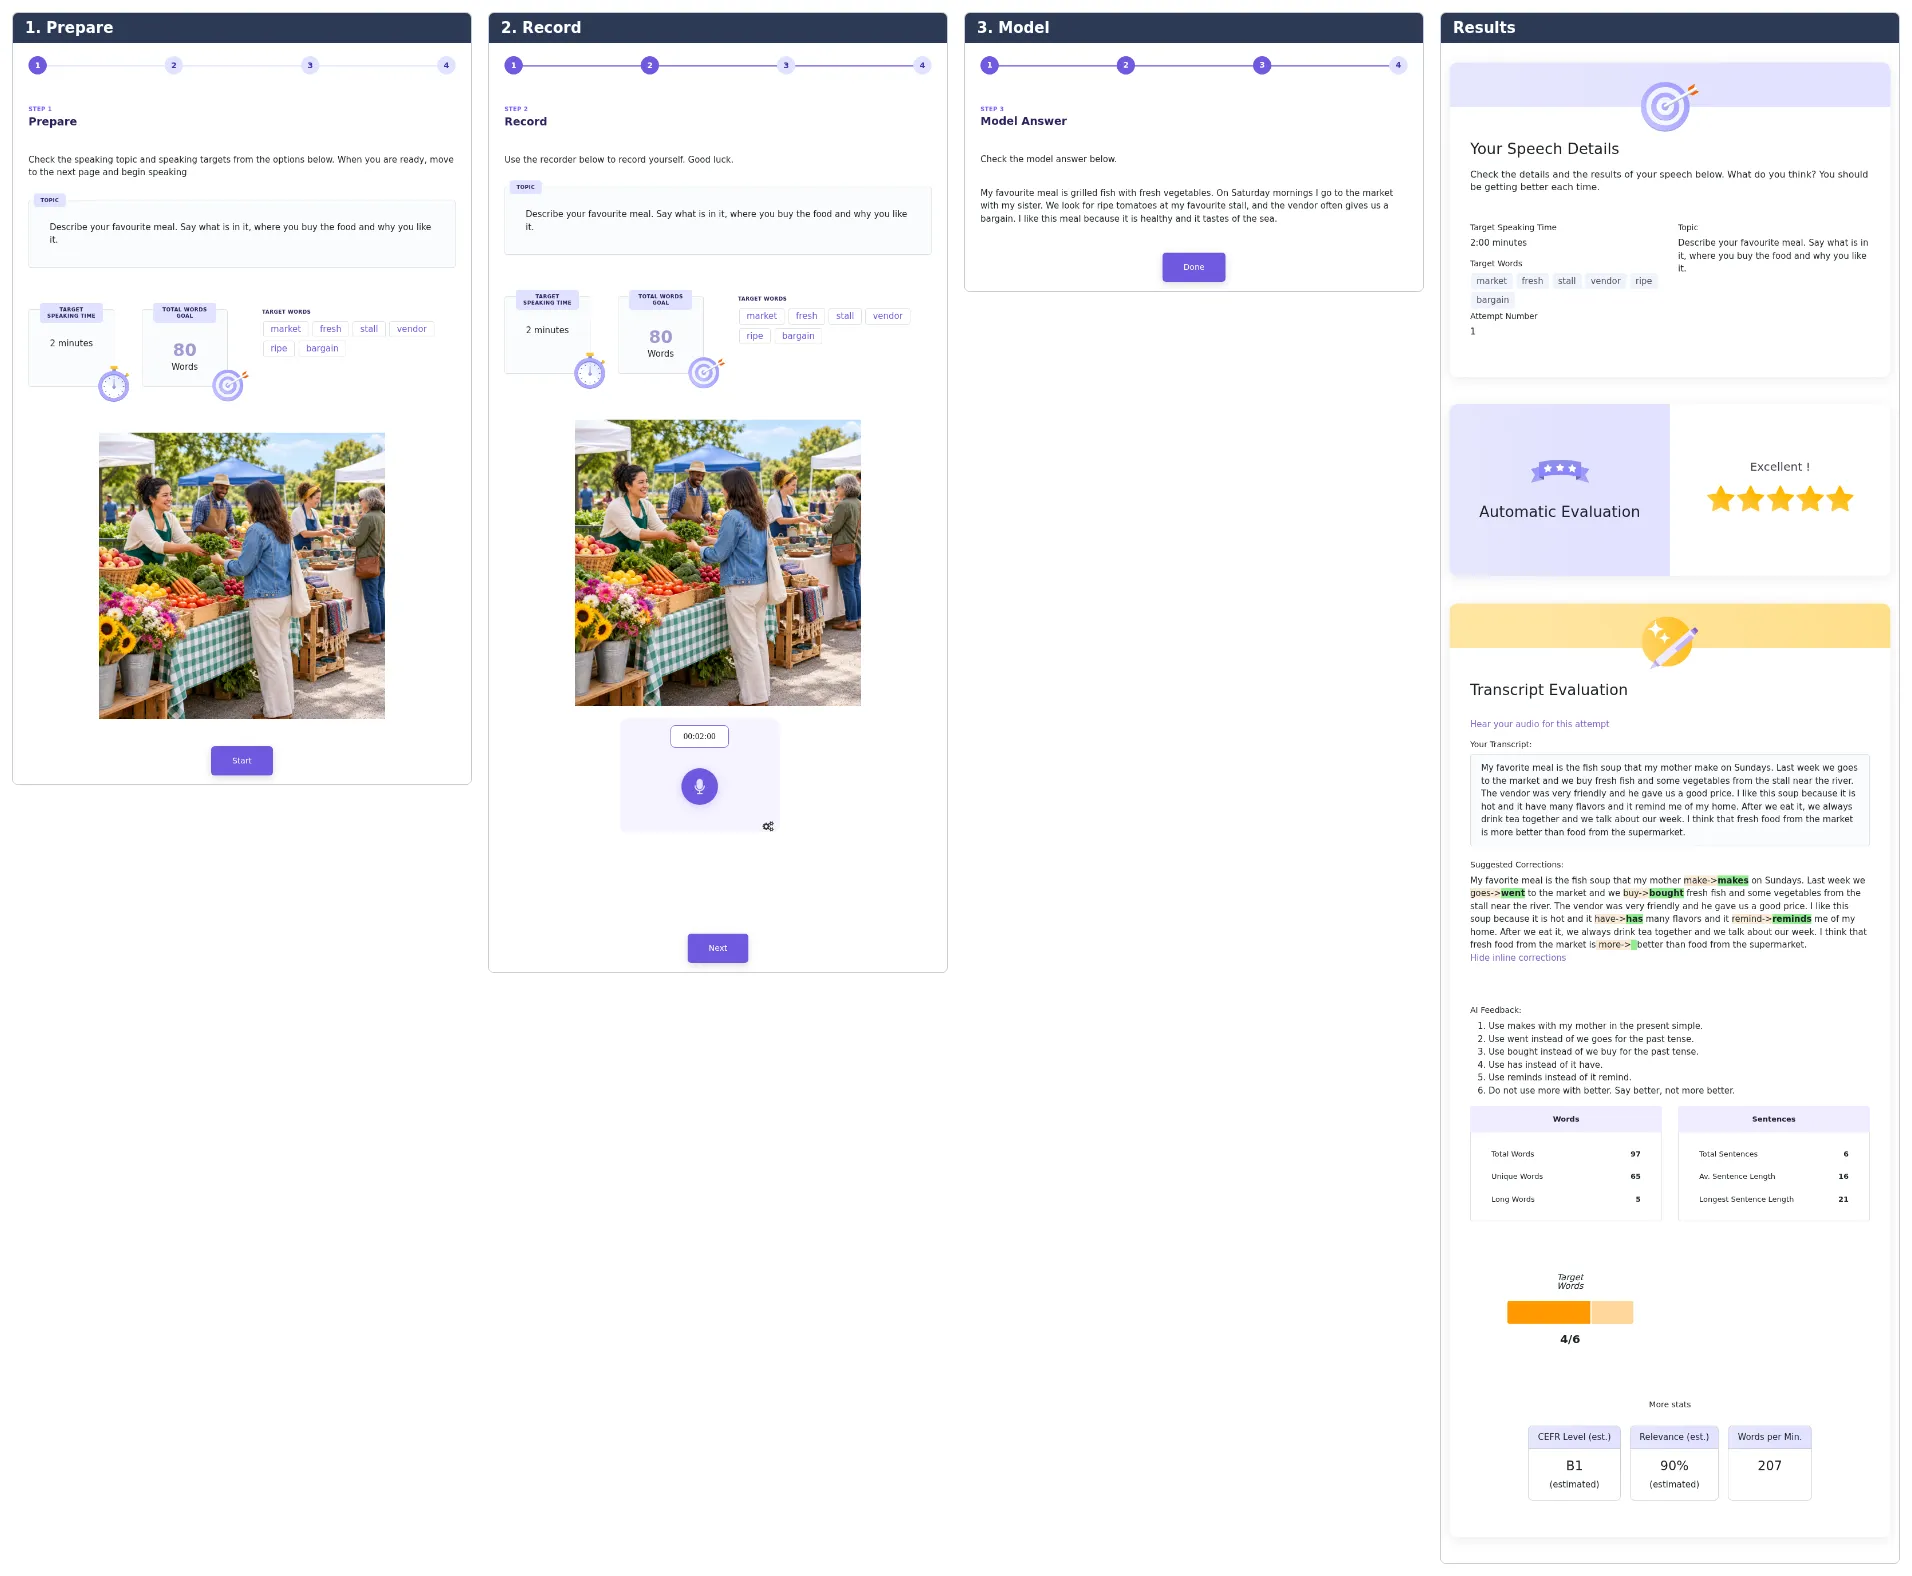
Figure 3.2. A student moving through the Prepare, Record and Model steps to the results.
3.2 Creating a Solo activity
Section titled “3.2 Creating a Solo activity”- In your course, turn Edit mode on and select +, then Activity or resource.
- Choose Poodll Solo and enter a name.
- Under Speaking Topic, enter the task, for example: Describe the best trip you have ever taken. Say where you went, what you did and why you enjoyed it.
- Review the Speaking Tips, which are shown to students. Edit them if you wish.
- Choose Activity Steps.
- Add any supporting media under Media Options (see below).
- Set the Speaking Targets.
- Under Language and Recording, set the Target Language and recording options.
- Check the AutoGrading settings.
- Select Save and display.
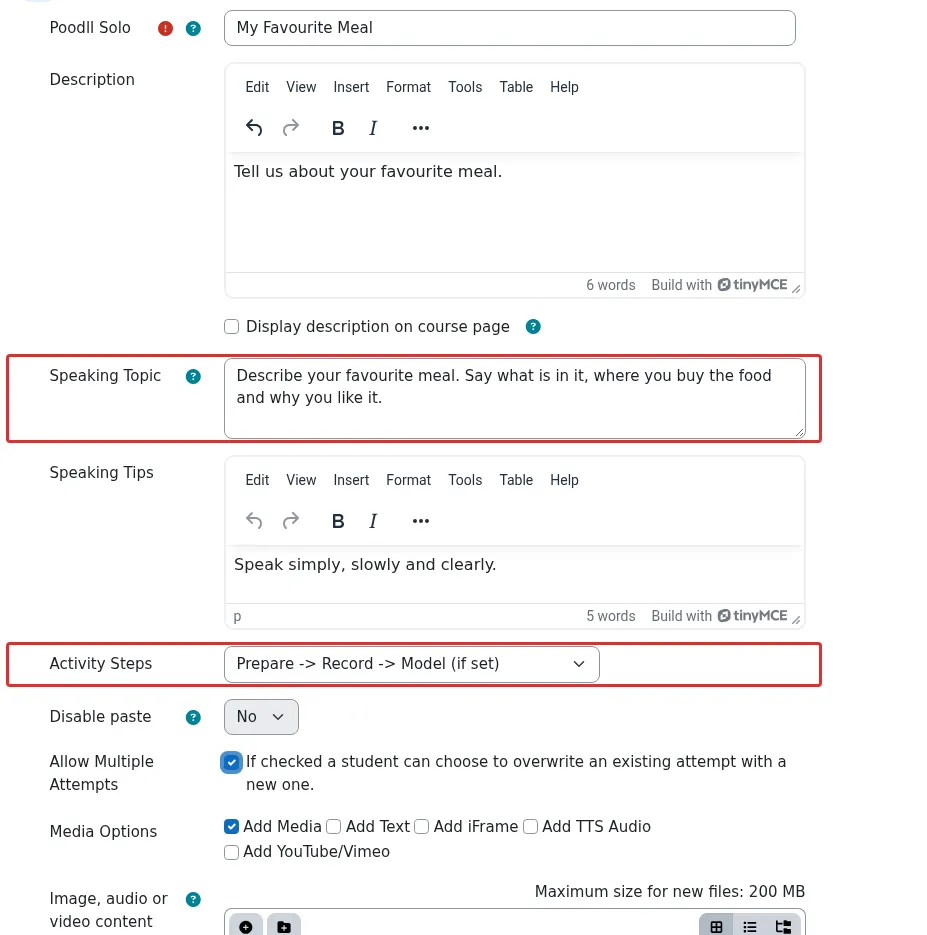
Figure 3.3. Setting the speaking topic and step sequence.
Supporting media
Section titled “Supporting media”You can give students something to respond to by choosing one or more Media Options:
- Add Media: upload an image, audio or video file.
- Add Text: add a reading text.
- Add iFrame: paste embed code from another site.
- Add TTS Audio: type text and generate spoken audio with a chosen voice and speed.
- Add YouTube/Vimeo: play a clip, with optional start and end times.
Teaching tip: A picture to describe or a short clip to respond to can make a task more engaging, and it gives weaker students ideas to talk about.
3.3 Setting targets and recording options
Section titled “3.3 Setting targets and recording options”Speaking Targets
Section titled “Speaking Targets”| Setting | What it does | Default |
|---|---|---|
| Target Time | The speaking time you are aiming for. | 2:00 minutes |
| Time limit | The maximum recording length. | 2:00 minutes |
| Target Words | Words or phrases students should try to use, each on a new line. Students can earn bonus points for using them. | None |
| Total Words Goal | The number of words needed to earn full marks for length. | 60 |
Set the Total Words Goal realistically for your students’ level and the time allowed. Learners who speak slowly may produce far fewer words per minute than you expect, and a goal that is too high will lower every student’s grade.
Language and Recording
Section titled “Language and Recording”| Setting | What it does | Default |
|---|---|---|
| Recording type | Records audio or video. | Audio Recorder |
| Recorder Style | The appearance of the recorder. | Solo |
| Use streaming recording | Transcribes as the student speaks, so that results are ready soon after they finish. See below. | No |
| Target Language | The language students will speak. | Site default |
| Days to keep file | How long the recording is kept. | 365 |
Streaming recording can use either the browser’s speech recognition or cloud recognition. It applies to audio recording in supported languages and sequences that have a record step. It is helpful when you want results quickly. If your students use mixed browsers, test it on the browsers they use.
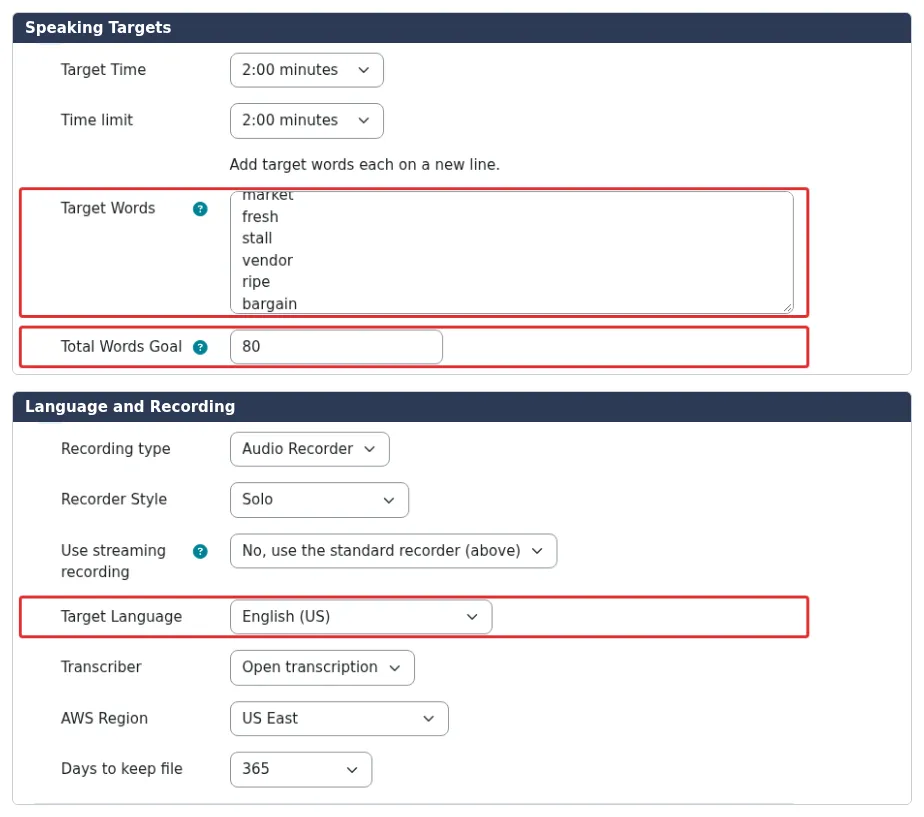
Figure 3.4. Speaking targets and recording settings.
Other options
Section titled “Other options”- Allow Multiple Attempts lets students try again. It is off by default.
- Disable paste stops students from pasting text into a typed step.
- Results Display controls whether results show estimated levels (CEFR, IELTS, TOEFL or Generic), and whether the grade appears as stars or as a percentage with a donut chart.
3.4 Understanding auto-grading
Section titled “3.4 Understanding auto-grading”The AutoGrading section of the settings shows the formula that Solo uses. You can change its parts.
Grade = (words spoken ÷ Total Words Goal) × base percentage × AI Grade × Relevance × Speaking clarity + Bonus Grades
| Part | What it means | Default |
|---|---|---|
| Word total | Counts either All word total or Unique word total, up to the goal. | All word total |
| Base percentage | The starting percentage. | 100% |
| AI Grade | A percentage awarded by AI, following your instructions. | Used |
| Relevance | How well the response matches the question topic or is similar to your model answer. A small margin is allowed. | Relevance to question topic |
| Speaking clarity | How closely the automatic transcript matches the student’s own text. Only meaningful in sequences where students type or check text. | Not used |
| Bonus Grades | Points added for each target word spoken, big word, sentence or idea/concept. | +3 per target word spoken |
Two text boxes tell AI how to behave:
- AI Grade Instructions, for example Deduct two marks for each grammar mistake.
- AI Feedback Instructions, for example Explain each grammar mistake simply.
AI Feedback Language sets the language of the feedback.
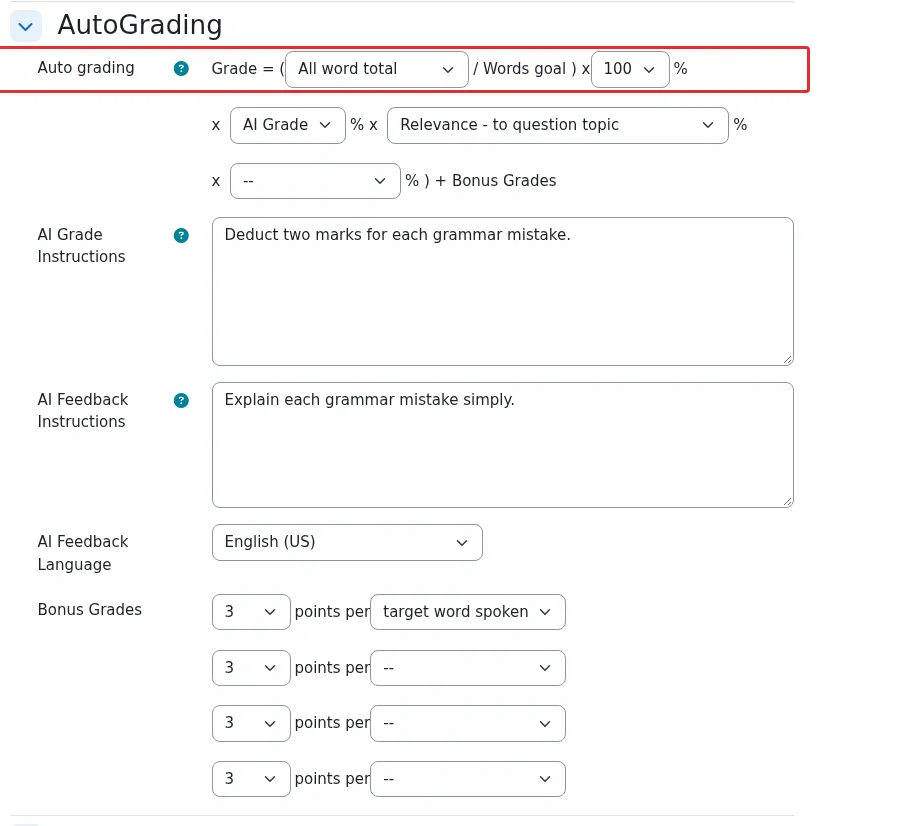
Figure 3.5. The AutoGrading section of the settings.
Testing your AI instructions
Section titled “Testing your AI instructions”Use the AI Grade Tester below the AutoGrading section to try your instructions before students begin. Enter a Sample Answer that is similar to a real student response and select Evaluate.
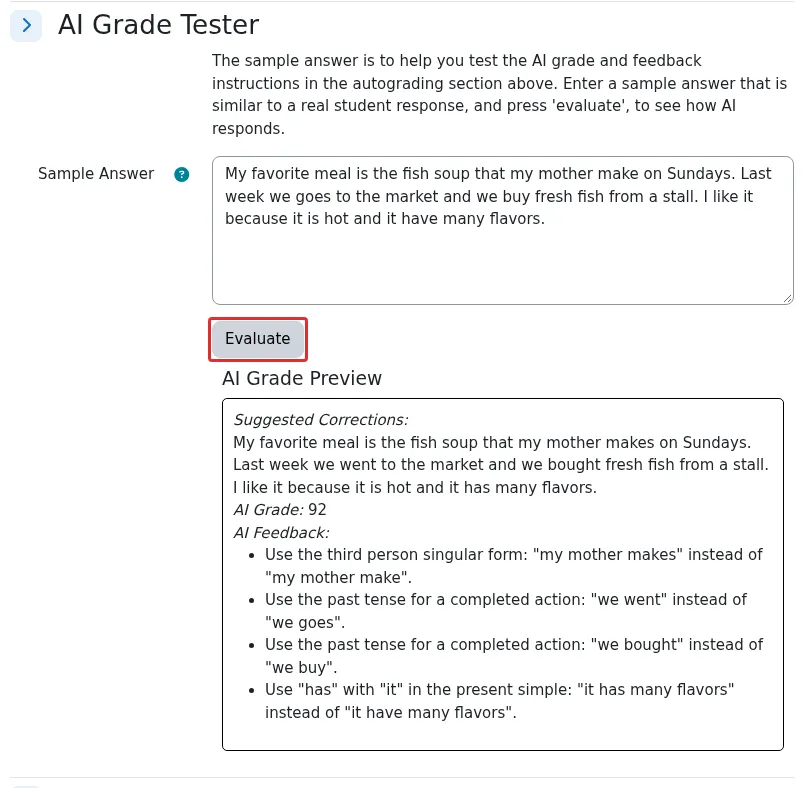
Figure 3.6. Testing AI grade and feedback instructions with a sample answer.
Model answers
Section titled “Model answers”The Model Answer section has two purposes. The text can be used to score relevance when the formula is set to Relevance - similarity to model answer, and it is not shown to students. Use the Media Options in that section if you want students to see or hear a model in the Model step.
3.5 What students see
Section titled “3.5 What students see”- Prepare. The student reads the topic, views any media and checks the targets.
- Record (or Type). The student allows microphone access if asked, then records or types a response. The topic text, tips and target words remain available.
- Model. If you set one, the student can review the model answer, then selects Done.
- Results. After processing, the student sees an evaluation (stars or a percentage, depending on Results Display), the transcript, statistics such as total words and words per minute, target words used, AI feedback and suggested corrections.
Processing can take a little time unless streaming recording is in use. Students can stay on the waiting page or return to the activity later.
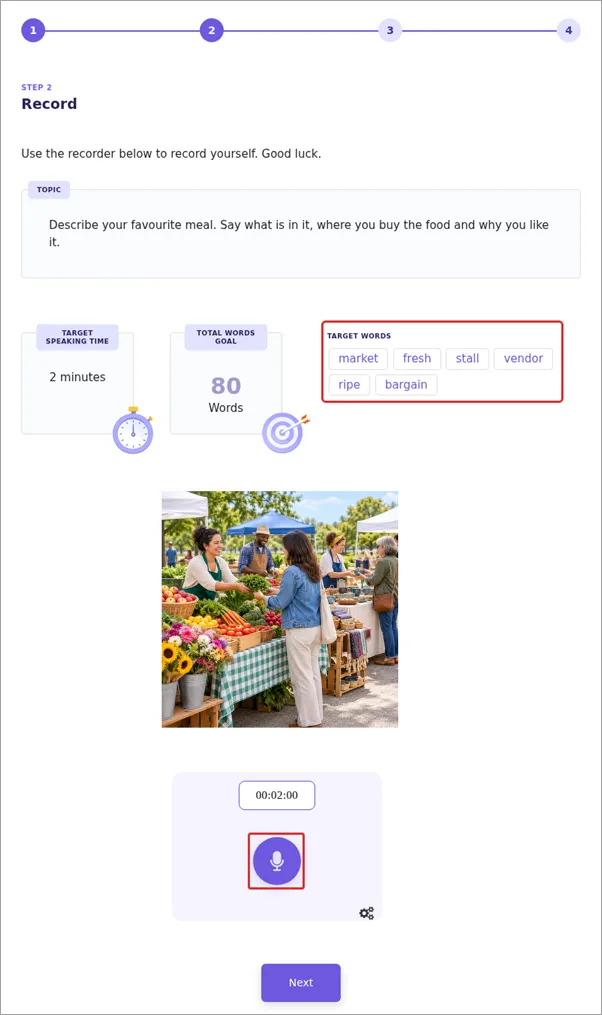
Figure 3.7. The Record step.
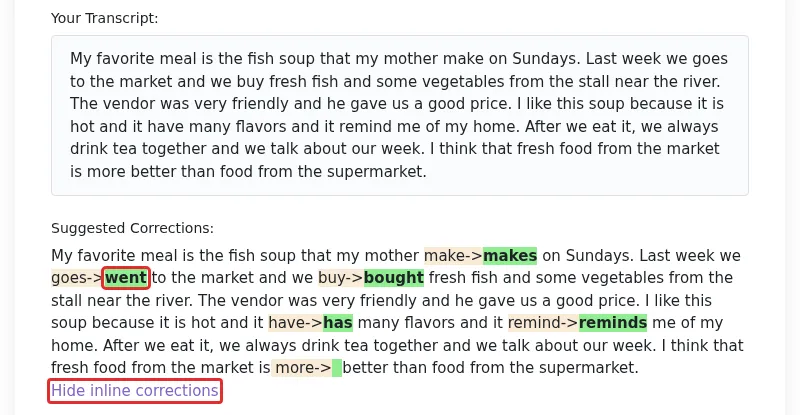
Figure 3.8. Suggested grammar corrections on the student’s transcript.
AI feedback is a suggestion. Transcription and AI grading can be wrong, especially with strong accents, background noise or unusual names. For higher-stakes assessment, listen to the recordings and review the grades.
3.6 Reviewing and grading attempts
Section titled “3.6 Reviewing and grading attempts”Solo gives you several ways to review students’ work.
| Tab | Use it to… |
|---|---|
| Attempts | Preview the activity and see attempts. |
| Grades | See each student’s speaking clarity, total words, target words, grade and who graded it. Select View to see the attempt or Grade to grade it. |
| Reports | Open the Attempts Report, Researcher Report, Class Progress, Incomplete Attempts and Download Audio reports. |
To grade manually or adjust a grade:
- Open the Grades tab.
- Find the student and select Grade. This opens the Grade submissions page, which can show several students side by side.
- Listen to the recording and review the transcript and AI evaluation.
- Select the grade entry, then enter a grade and any comments in the dialog that opens.
- Save the grade.
Set the Grading method in the Grade section of the activity settings. Simple direct grading is the default, and you can also choose a Rubric. Your comments appear in a separate teacher evaluation section of the student’s results.
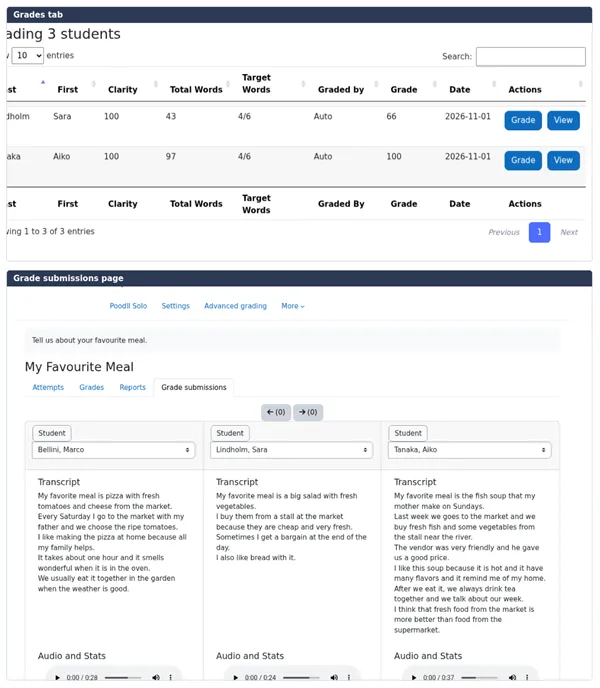
Figure 3.9. Opening and grading a submission.
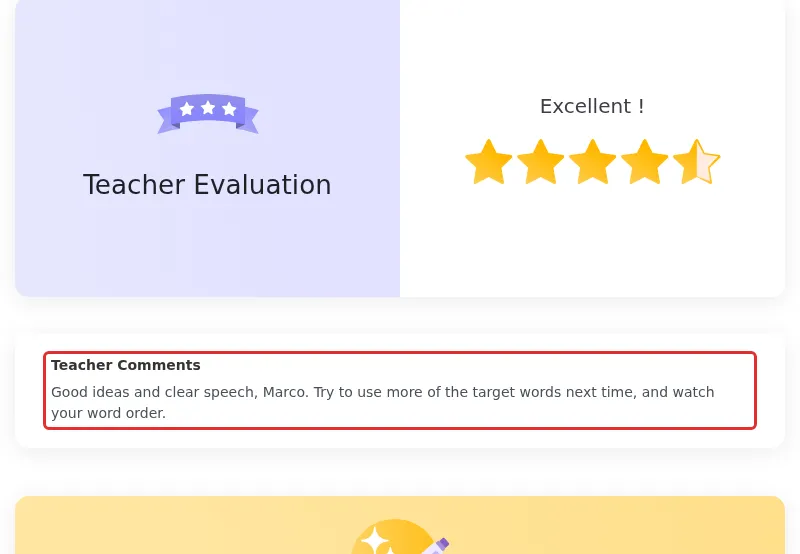
Figure 3.10. A teacher’s evaluation as seen by the student.
For activity completion, Solo offers the condition Complete when all steps completed.
3.7 Common questions
Section titled “3.7 Common questions”Should I use Solo or a Free Speaking item in MiniLesson?
Section titled “Should I use Solo or a Free Speaking item in MiniLesson?”Use Solo for a substantial stand-alone task with reports, manual grading and class progress information. Use Free Speaking when the task is one step within a longer lesson.
Why is a student’s grade low when they spoke well?
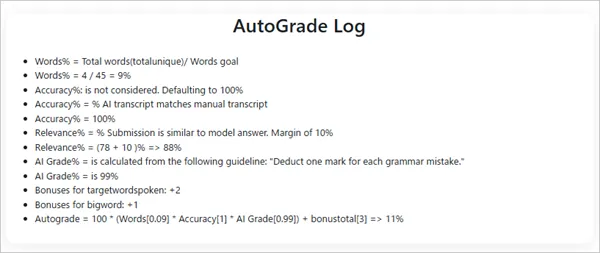
Section titled “Why is a student’s grade low when they spoke well?”Check the Total Words Goal, the AI Grade Instructions and the relevance setting. A student who is on topic but well below the word goal, or who answers a slightly different question, can lose marks. Open the attempt to see the breakdown and adjust the grade if necessary. Note that on the teachers view of a student attempt there is an autograde log which can help you understand the grade calculation.
Can I use Solo for writing only?
Section titled “Can I use Solo for writing only?”Yes. Set Activity Steps to Prepare → Type → Model. Consider enabling Disable paste if students should write the text themselves.
Can students choose the language of their feedback?
Section titled “Can students choose the language of their feedback?”If your administrator has enabled native language features, a student’s chosen language can override the activity’s Feedback Language. However the native language preference can only be set from Wordcards or MiniLesson currently. See Section 6.2.