
2. Recording Audio and Video in the Moodle Editor
Cloud Poodll lets teachers record audio, video and screencasts directly into Moodle content. You can use a short recording to explain an activity, demonstrate pronunciation, introduce a topic or give students instructions. Where your organisation permits it, students can also use these tools in Moodle text editors, for example when posting to a forum.
This section explains how to use Cloud Poodll recording tools in the Moodle text editor. It does not cover recording assignment submissions or recording quiz answers, which use separate Cloud Poodll plugins.
Which editor does your site use? On Moodle sites using the TinyMCE editor, the recording tools may be provided by Tiny Poodll. Sites using the Atto editor may show Cloud Poodll for Atto.
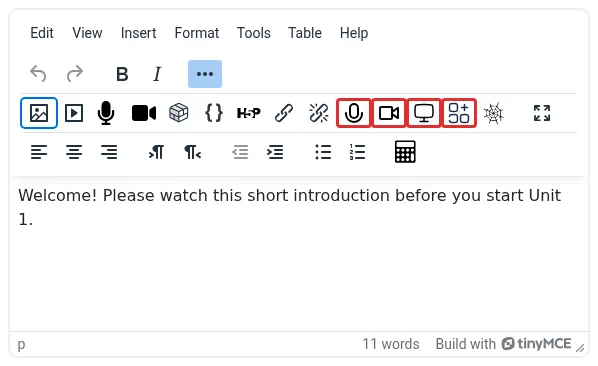
Figure 2.1. Cloud Poodll recording tools in a Moodle editor toolbar.
Note that Moodle itself may have it’s own audio and video recorder icons on the toolbar. Those are solid black and should not be confused with Poodll
2.1 Finding the Cloud Poodll recording buttons
Section titled “2.1 Finding the Cloud Poodll recording buttons”Cloud Poodll’s editor tools appear within the normal Moodle text editor. For teachers, this may include course pages, labels/text and media areas, activity descriptions, forum messages and other text fields.
- Open a Moodle course and navigate to content you can edit, such as a Page resource.
- Choose Edit settings or another action that opens the text editor.
- Locate the Poodll buttons in the editor toolbar. If the toolbar is collapsed, expand it to show additional buttons.
- Choose the button for the recording type you want.
Depending on your site configuration, you may see:
| Toolbar tool | What it does |
|---|---|
| Audio (microphone) | Record from your microphone, or upload an existing audio file. |
| Video (camera) | Record from your camera and microphone, or upload an existing video file. |
| Screen (screen/monitor) | Record a browser tab, window or screen. |
| Widgets | Insert an available Poodll widget; widget options vary and are outside the main recording workflow in this section. |
Don’t see the buttons? Your institution may use a different Moodle editor, or a site administrator may not have installed or enabled them.
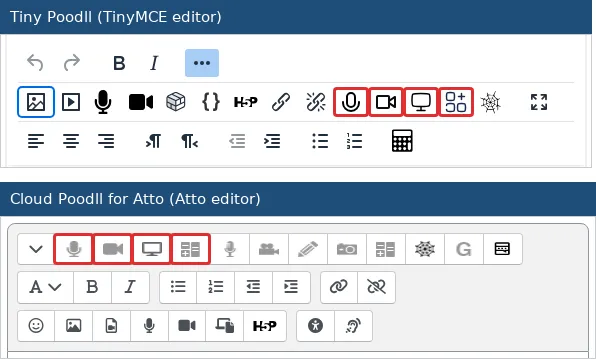
Figure 2.2. Toolbar comparison: Tiny Poodll and Cloud Poodll for Atto.
2.2 Recording and inserting audio
Section titled “2.2 Recording and inserting audio”Use audio recordings for pronunciation models, listening instructions, short announcements or verbal explanations.
- Open the Moodle text editor where the recording should appear.
- Place the cursor at the position where you want to insert the recording.
- Select the Poodll audio (microphone) button.
- In the recorder dialog, open Record if necessary.
- If the browser asks to use your microphone, choose Allow. Check that the correct microphone is connected and selected.
- Select Record and speak clearly.
- Select Stop when finished. Depending on the recorder interface, you may be able to listen back and record again before submitting.
- Click the recorder’s Upload button.
- After the upload completes, a media player or media link is inserted into the text editor.
- Save the Moodle page or activity. Open the finished page to check that the recording plays correctly.
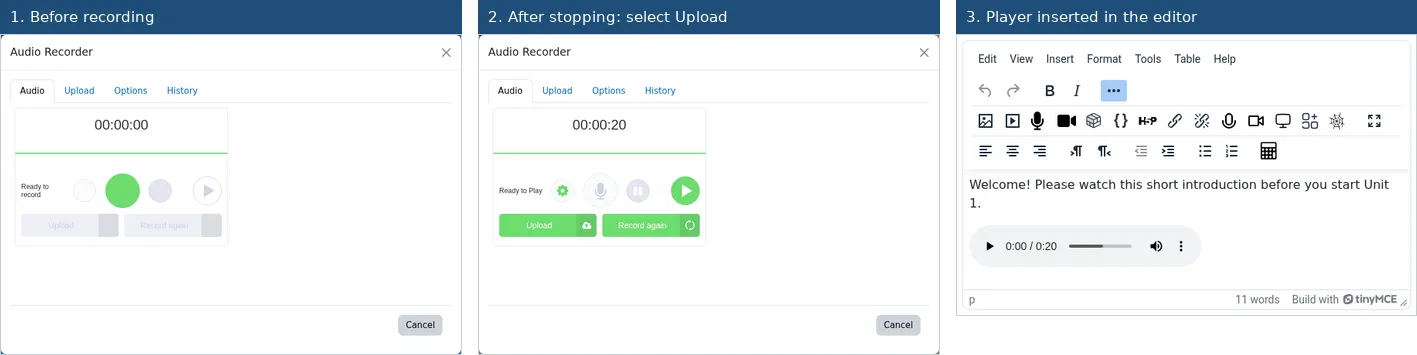
Figure 2.3. Record, finish/upload and insert an audio recording.
Teaching tip: A headset microphone can often produce clearer audio than a laptop’s built-in microphone.
2.3 Recording and inserting video
Section titled “2.3 Recording and inserting video”Video recordings are useful for welcoming students, explaining tasks, demonstrating speaking activities or giving instructions that benefit from facial expression or gesture.
- Open the Moodle text editor and place the cursor where the video should appear.
- Select the Poodll video (camera) button.
- Allow the browser to use your camera and microphone, if prompted.
- Check the preview and confirm that the correct devices are in use.
- Start recording, speak or demonstrate your task, and then stop.
- Review or retry the recording if your selected recorder supports this.
- Finish the upload and wait until the player or link is inserted into the editor.
- Save the Moodle content and open it as a student would to verify playback.
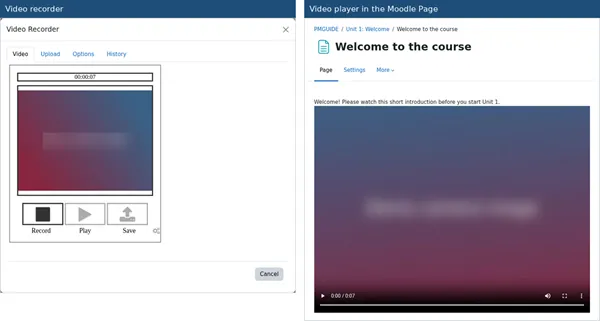
Figure 2.4. Video recording interface and the resulting embedded video.
2.4 Uploading existing audio or video files
Section titled “2.4 Uploading existing audio or video files”You do not have to record directly into Moodle. The Cloud Poodll audio and video dialogs also offer an Upload tab, allowing you to add a file you made earlier. The file will be saved in the cloud and converted to mp3 or mp4.
- Place the cursor in the Moodle text editor where the recording belongs.
- Select the Video or Audio button, matching the kind of file you want to insert.
- Open the Upload tab, if available.
- Select Choose file and locate the recording on your device. It is also possible to drag and drop files.
- Wait for the upload and any processing to complete.
- Confirm that a player or link appears in the text editor, then save the Moodle content.
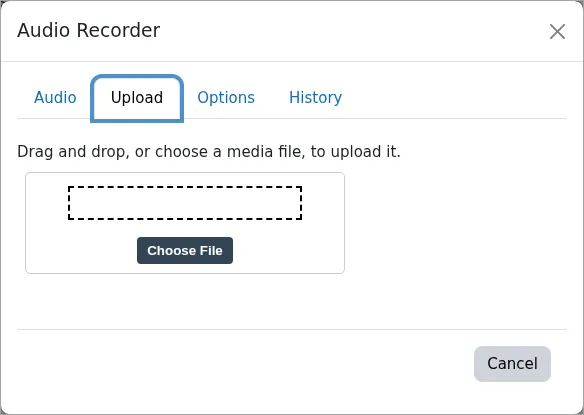
Figure 2.5. Uploading an existing recording through Cloud Poodll.
Note: Playback is not optimised for long videos (30 minutes or more). They may take some time to be ready to play after uploading or when you visit the file in a player.
2.5 Recording your screen
Section titled “2.5 Recording your screen”Screen recordings, sometimes called screencasts, let you demonstrate a website, a software application, a slide presentation or a Moodle task. The Poodll screen recorder is basic, does not record your voice and it does not have any editing features. So use a dedicated screen recording software for anything more than very basic screencasts.
- Open the Moodle editor and position the cursor where the screencast should be inserted.
- Select the Poodll screen recording button.
- Start the recording workflow. When your browser opens the screen-sharing chooser, select the browser tab, application window or entire screen you want to share.
- Confirm the browser’s Share action. Depending on your setup, you may also need to allow microphone access.
- Demonstrate the task you want students to see.
- Stop the recording using the recorder’s stop control or the browser’s screen-sharing controls, as appropriate.
- Wait for the recording to upload and be inserted into the editor.
- Save the Moodle content, then open the saved page and test playback.
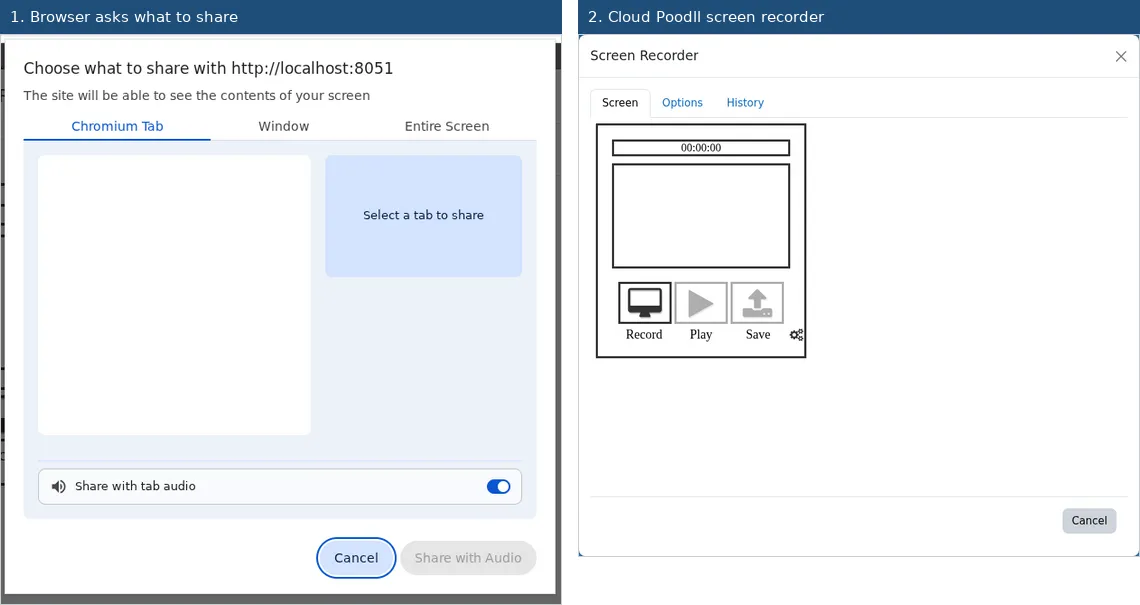
Figure 2.6. Choosing a screen or tab and inserting the finished screencast.
Screen recording availability varies. Browsers and devices differ in what they can share, and audio capture options may be limited.
Teaching tip: Prepare the browser tab or application before recording. Close unrelated windows and turn off on-screen notifications so they do not appear in your screencast. Short screencasts also upload and process faster than long ones.
2.6 The Options tab: players, expire days and subtitles
Section titled “2.6 The Options tab: players, expire days and subtitles”The audio, video and screencast popups each have an “options” tab. The options tab is actually very important. There are three key settings.
- Media player or link - This affects exactly what is inserted into the html area. A link is more compact and other filter plugins (eg Poodll filter) can act on it. But the default is a media player.
- Expire days - After this period of time your video/audio will be deleted. If you never want it deleted set this to “never exire”
- Subtitles - If you enable subtitles and set the language of speech, Cloud Poodll will add subtitles to your audio or video. The key thing to note here is that audio players often do not display audio subtitles. Among the Poodll widgets that you can choose in the widgets tab there are audio players. Surround the media player or link with the audio widget player tags, and they will display subtitles.
NB: Subtitles must be enabled before recording has commenced. Turning it on afterwards will not enable it.
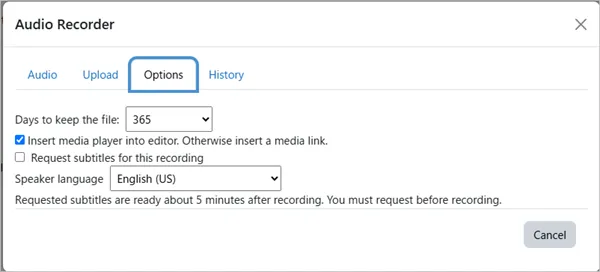
Figure 2.7. Tiny Poodll options tab.
2.7 Adding recordings to course pages, forums and other Moodle content
Section titled “2.7 Adding recordings to course pages, forums and other Moodle content”The editor tools are useful because they can be used in different places in Moodle, not just in assignments.
| Moodle location | Example teacher use |
|---|---|
| Page resource | Add a welcome video or pronunciation examples to a lesson page. |
| Text and media area (or Label on older Moodle sites) | Add a short spoken introduction directly on the course page. |
| Activity instructions or description | Explain what students should do before starting an activity. |
| Forum post | Record a spoken question or prompt to start a discussion. |
| Other text editor fields | Insert media where your site allows the Cloud Poodll toolbar and playback. |
To add a recording, open the appropriate editor, follow the audio/video/screen recording steps above, and save the Moodle content.
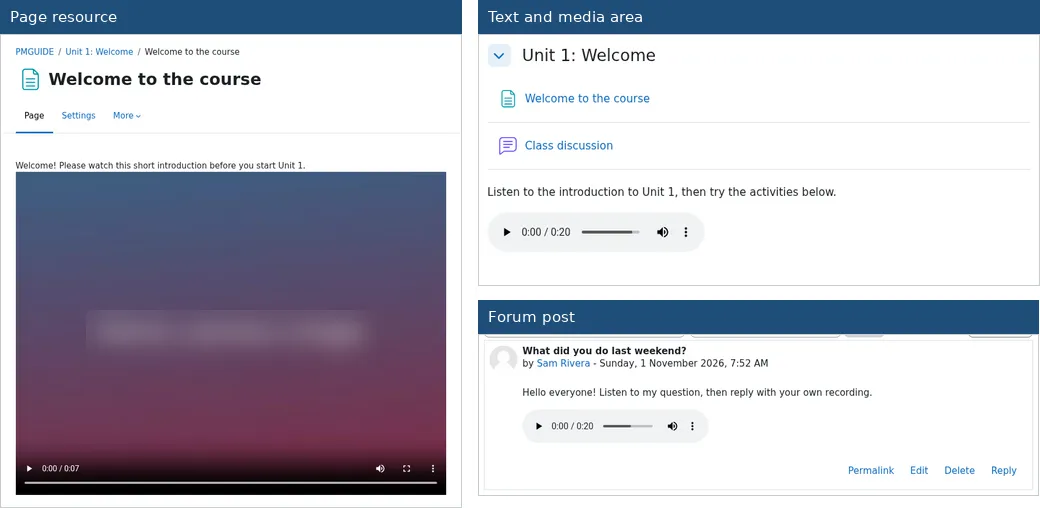
Figure 2.8. The same recording tools used in different Moodle text editors.
2.8 Replacing or removing a recording
Section titled “2.8 Replacing or removing a recording”Once a recording has been inserted, you can move its player within the editing area or delete it from that content. There is no way to edit a recording, so the usual approach is to record again and replace the inserted media. Since the media is stored in the cloud, copying a player or link and pasting it in a different activity also works.
To replace a recording:
- Open the relevant Moodle page, post or activity for editing.
- Find the existing media player or link in the text editor.
- Remove it from the text, taking care not to delete surrounding content.
- Use the appropriate Poodll toolbar button to record or upload the replacement.
- Save the Moodle content and verify that the new recording plays.
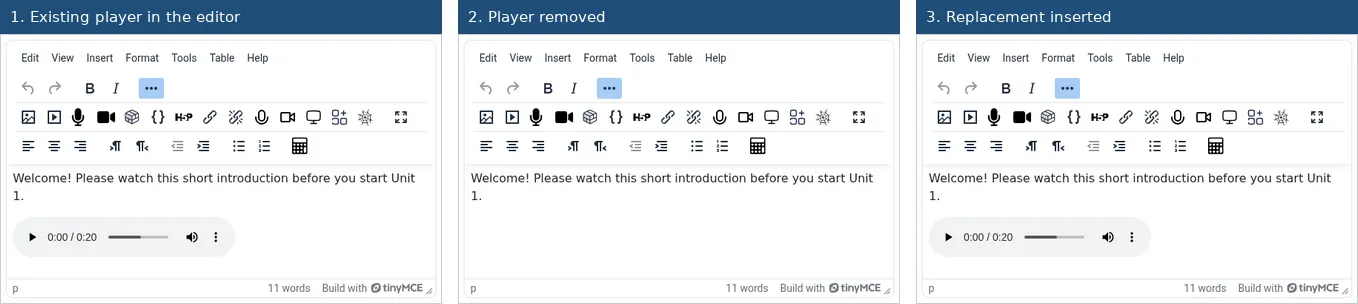
Figure 2.9. Replacing an embedded recording in Moodle content.
Storage note: Removing a media player or link to a Cloud Poodll recording does not delete the cloud-stored recording. If you need a recording permanently removed for privacy or retention reasons, contact your Moodle administrator or your institution’s support team.
Further information
Section titled “Further information”- Using Cloud Poodll for Atto — Poodll Support
- Hiding and showing Tiny Poodll — Poodll Support
- Cloud Poodll and screen recording — Poodll Support
- Poodll Media overview